TAPESTREA : Transformation + Synthesis interfaces
|
version: |
0.1.x.x (tap tap)
|
|
home: http://taps.cs.princeton.edu

Figure 1 : Synthesis interface full-shot
Getting started
The synthesis face is divided into three areas. The top half displays a
timeline and related controls. The bottom left displays the internal
library of available templates (with a rectangle around the currently
selected one), while the bottom right displays transformation and
synthesis parameters for the selected template. A template is selected by
clicking its icon in the library.
An overview of the row of buttons near the center of the screen :
- load : Opens a file dialog box from which various taps files can
be loaded. What happens next depends on what kind of file is loaded.
- .tap : Reads in a template and adds it to the library.
- .ck : Loads a ChucK script.
- .qz : Reads in a quantization table and associates it with
the currently selected template.
- listen : Plays the selected template.
- stop : Stops the selected template (or ought to).
- revert : Reverts to a previous version of the selected
template. Usually if a template's parameters are modified, hitting
revert undoes the changes by returning the template to the state
it had when it was first selected (this time). Thus hitting revert
immediately after selecting a template makes no change. Also, it is not
possible to revert to previous versions of timelines or mixed bags.
- copy : Makes a copy of the selected template and adds it to
the library.
- save : Saves the selected template as a .tap file.
In addition, checking the write to file boxes at the center left
write all synthesized sound (and silence) to one or two files, while the
boxes remain checked. The write2 box writes a stereo .wav
file, the write8 box writes an 8-channel .wav file, and the
both box writes, well, both. The file names contain "tapestrea" as
well as a timestamp, for identification. They are saved in the working directory.
Using the library
The library pane shows an icon for each available template.
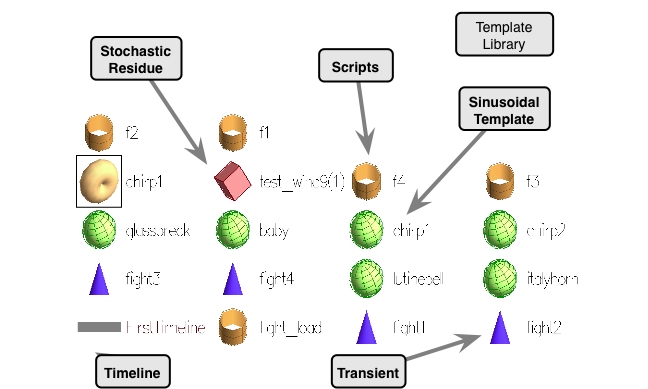
Figure 2 : Zoom in on library pane (by pressing
1)
Some points to note are :
- The shape and color of the icon show the template type. (For example,
green spheres are deterministic events, donuts are loops, and so on.)
- Clicking on a template selects it. The bottom right pane then displays
the controls for that template, which can be manipulated in real-time.
- To delete a template from the library, select it and hit the
"backspace" or "delete" key (on the keyboard). A template only gets
deleted if it is not being used in a timeline or mixed bag.
- To play a template without selecting it, right click on it.
Creating a loop
A loop can be created from a deterministic or transient event template as
follows.
- Select the event template.
- Among the event parameters, click in the box entitled loop me
to make sure that option is selected (marked by a green sphere).
- Click the copy button.
A new loop from the selected event should now appear in the library. It
can be selected, played and manipulated as desired.
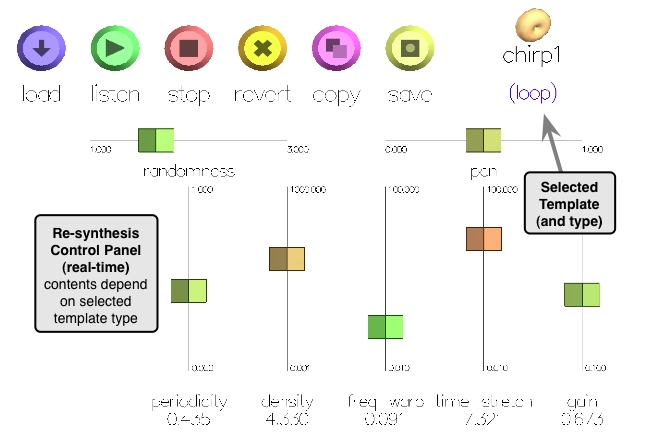
Figure 3 : Zoom in on loop control pane (by pressing 2)
Creating and using a timeline
- A timeline is created by specifying a duration and clicking the
new button at the top right.
- The new timeline created is automatically selected and displayed
across the top. In the library pane, the name of the currently displayed
timeline is always written in dark red instead of black.
- The duration of the current timeline, in seconds, is displayed at the
top left. If no timeline is being displayed, a message to that effect
appears instead.
- The duration can also be modified after the timeline has been created,
simply by altering the duration controls at the top right. If a timeline
is shortened so that some of the events on it occur too far from the
beginning to get played (or displayed), their existence is marked by a red
arrow/triangle at the right end of the timeline.
- Tick marks appear on the timeline at intervals of the currently
selected duration unit (or the next lowest unit, if the duration is a
proper fraction of the current unit).
- You can zoom in on parts of the timeline using the zoom and
shift sliders below the timeline (not shown in figure).
- To add a template to a timeline, drag and drop its icon from the
library onto the timeline. The dropped icon's horizontal distance from the
beginning of the timeline determines when the template is played. Its
vertical distance from the center currently means nothing.
- To reposition a template already on the timeline, drag and drop the
icon on the timeline (to elsewhere on the timeline).
- To remove a template from a timeline, drag its icon off the timeline
into white space.
- To play the timeline, select it and hit listen. The left
and right boundaries on the timeline specify the time range that is
synthesized and can be adjusted to play a certain region.
Creating and using a mixed bag
- A new mixed bag is created by typing N (shift +
n) on the keyboard.
- Templates can be added to a mixed bag by dragging them from the
library pane to the parameter/control pane (bottom right quadrant) while
the appropriate mixed bag is selected.
- Templates can be removed from the mixed bag by dragging them off it
into white space. This can be done even while the mixed bag is playing.
- The overall mixed bag controls are originally visible when a new mixed
bag is created. To access individual template parameters within a mixed
bag, select the see LOCAL controls box. To access the global
parameters again, unselect that box.
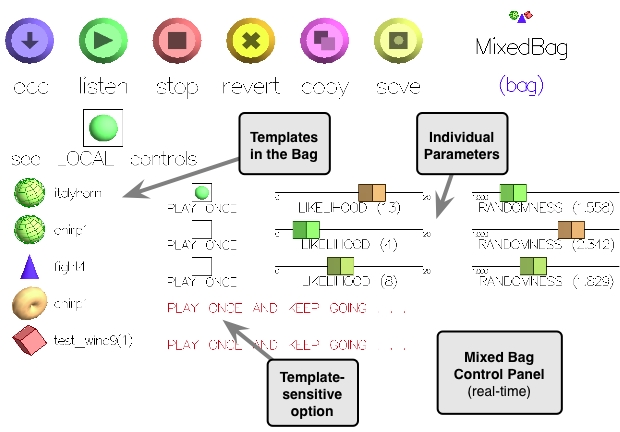
Figure 4 : Zoom in on mixed bag control pane
Using ChucK scripts
ChucK scripts let you assert
more precise control over the timing and value of synthesis parameters.
They also enable more specialized tasks such as changing multiple
parameters simultaneously, controlling synthesis via OSC or MIDI messages,
loading a set of templates via a single script, and adding to the
graphical user interface. The scripting API for synthesis is listed here.
Special commands
Some of the special (or obscure) keyboard commands for the synthesis face
have already been mentioned, but here they are again, along with some new
ones.
Backspace	: delete selected template from library
Space bar	: play selected template (short cut)
N (shift + n)	: create a new mixed bag
q or z		: toggle display of quantization markers
		  (if a template has associated quantization tables, a small
		   blue or green marker appears next to its icon when this
		   display is on, as it is by default)
|